1
2
3
4
5
6
7
8
9
10
11
12
13
14
15
16
17
18
19
20
21
22
23
24
25
26
27
28
29
30
31
32
33
34
35
36
37
38
39
40
41
42
43
44
45
46
47
48
49
50
51
52
53
54
55
56
57
58
59
60
61
62
63
64
65
66
67
68
69
70
71
72
73
74
75
| <!DOCTYPE html>
<html>
<head>
<title></title>
<meta name="" content="" charset="utf-8"/>
<script type="text/javascript" src="https://cdn.jsdelivr.net/vue/2.1.3/vue.js"></script>
</head>
<body>
<div id="app">
<p>{{ message }}</p>
</div>
<script type="text/javascript">
var app = new Vue({
el: '#app',
data: {
message : "xuxiao is boy"
},
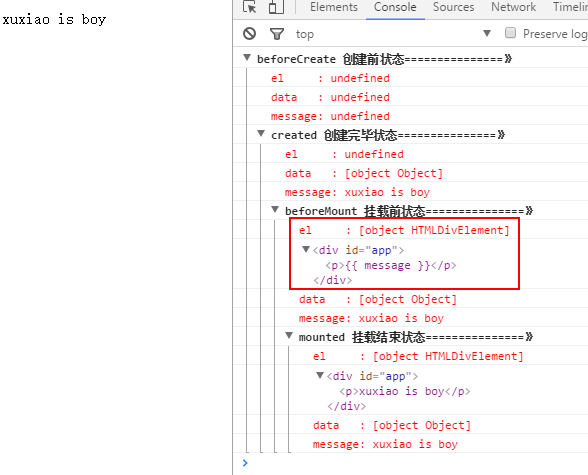
beforeCreate: function () {
console.group('beforeCreate 创建前状态===============》');
console.log("%c%s", "color:red" , "el : " + this.$el); //undefined
console.log("%c%s", "color:red","data : " + this.$data); //undefined
console.log("%c%s", "color:red","message: " + this.message)
},
created: function () {
console.group('created 创建完毕状态===============》');
console.log("%c%s", "color:red","el : " + this.$el); //undefined
console.log("%c%s", "color:red","data : " + this.$data); //已被初始化
console.log("%c%s", "color:red","message: " + this.message); //已被初始化
},
beforeMount: function () {
console.group('beforeMount 挂载前状态===============》');
console.log("%c%s", "color:red","el : " + (this.$el)); //已被初始化
console.log(this.$el);
console.log("%c%s", "color:red","data : " + this.$data); //已被初始化
console.log("%c%s", "color:red","message: " + this.message); //已被初始化
},
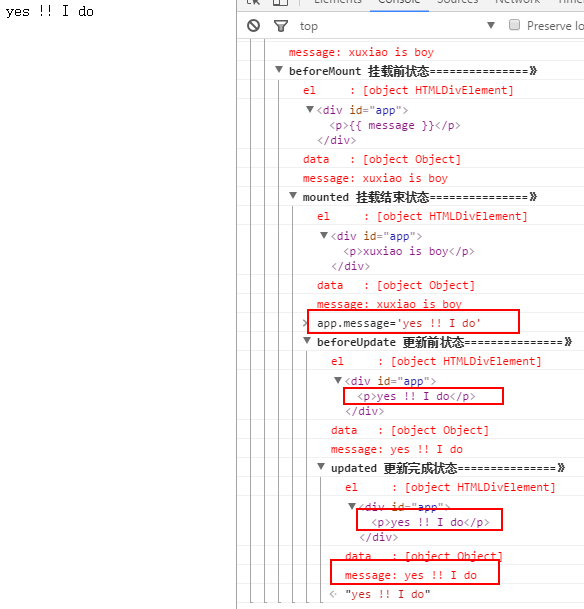
mounted: function () {
console.group('mounted 挂载结束状态===============》');
console.log("%c%s", "color:red","el : " + this.$el); //已被初始化
console.log(this.$el);
console.log("%c%s", "color:red","data : " + this.$data); //已被初始化
console.log("%c%s", "color:red","message: " + this.message); //已被初始化
},
beforeUpdate: function () {
console.group('beforeUpdate 更新前状态===============》');
console.log("%c%s", "color:red","el : " + this.$el);
console.log(this.$el);
console.log("%c%s", "color:red","data : " + this.$data);
console.log("%c%s", "color:red","message: " + this.message);
},
updated: function () {
console.group('updated 更新完成状态===============》');
console.log("%c%s", "color:red","el : " + this.$el);
console.log(this.$el);
console.log("%c%s", "color:red","data : " + this.$data);
console.log("%c%s", "color:red","message: " + this.message);
},
beforeDestroy: function () {
console.group('beforeDestroy 销毁前状态===============》');
console.log("%c%s", "color:red","el : " + this.$el);
console.log(this.$el);
console.log("%c%s", "color:red","data : " + this.$data);
console.log("%c%s", "color:red","message: " + this.message);
},
destroyed: function () {
console.group('destroyed 销毁完成状态===============》');
console.log("%c%s", "color:red","el : " + this.$el);
console.log(this.$el);
console.log("%c%s", "color:red","data : " + this.$data);
console.log("%c%s", "color:red","message: " + this.message)
}
})
</script>
</body>
</html>
|